Contents of this article:
- Creating a Group
- Building a Group
- Adding a Banner and Logo
- Adding Pages
- Adding Headings
- Changing the Page Order
- Page Edit Icons
- Editing Layout
- Publishing
- Adding Text
- Adding Images and Videos
- Adding Insights
- Adding Discussions
- Adding Attachments
Creating a Group
To create a Group, click the Create Group + button in the top left corner.
Give your Group a name and a description and click Next.
Please note the Group name needs to be unique. If you enter a name that is already taken you will see an error message and need to select a different one.
Next, choose the level of privacy you want your Group to have within your organisation.
Building a Group
Adding a banner and a logo
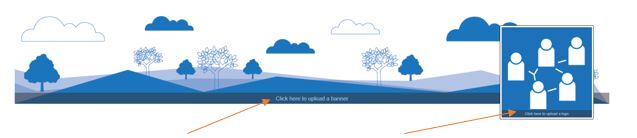
At the bottom of the banner image and profile image is a bar labeled Click here to upload a banner / logo.
Click this to upload an image. To fit perfectly, the images must be the following dimensions:
Banner: 1895 x 300px
Logo: 300 x 300px
If the image does not match these sizes, it will become distorted.
Adding Pages
To add a page to your Group, click the New button on the left hand side, then click New Page.
Adding Headings
You can separate your pages into sections using headings.
To add a heading, click the New button on the left hand side, then click New Heading.
Give your heading a title and click Save to add it in among your pages.
Changing the Page Order
You can move pages and headings up and down the contents list using the arrows that appear to the right or by dragging and dropping the item where you would like it to fit.
Click and drag the Heading or Page up or down to position it where you'd like, then hit Done.
Page Edit Icons
Next to the name of the page, click the cog icon to make changes. Your options are:
- Edit to modify your content.
- Rename to edit the name of the page.
- Publish to publish or unpublish the page. Members of the Group will be able to see the content once the page is published.
- Delete to delete the page.
Editing Layout
1. Enter the title of your page. You can change this at any time.
2. Use these tools to add bold text, italics,
Quotes and more. Hover over each button to see what it does.
3. This is the Editing Pane. Type your text here.
4. This is the Preview Pane. This will show you what your page will look like when published. It updates in real time.
5. Use these buttons to save or publish your page.
Publishing
You can also publish a page by click the cog icon, then hit Publish.
Once published, your page is visible to everyone who is a member of the group. You can still edit the page and also unpublish it if you no longer want people to be able to see it.
Unpublished pages will show a crossed out eye symbol. Published pages will show in normal text.
Adding Text
Add text to your page by typing in the editing pane on the left. You can see how it will look in the preview pane on the right.
You can give your text special styles by clicking the buttons above the editing pane. This will insert special characters into your text, giving it attributes such as bold, italics or 'emphasis.'
Adding Images and Videos
Image
Multiple Images
Reflections or Videos
Add a reflection by clicking Insert+ and then Reflection Link or Video.
NOTE: A Reflection must be shared to the group first.
Size and Positioning
It will also mention where to place the text you would like to appear alongside the image.
Adding Insights
You can share feedback Insights with other users via Groups. This is a great way to create a shared Insights library.
NOTE: Insights must be shared with the Group before they can be added.

Add an insight by clicking Insert+ and then Insight. Select from the list of insights that have been shared to the group to add a link to it.
For more information on Insights, visit here.
Adding Discussions
Discussion Boards are mini forums where users can discuss topics related to the group. The group administrator can set a topic for the discussion, moderate posts, or lock the discussion if they want.
Discussion Boards can be added to any group page using the Insert+ drop down menu and selecting Discussion.
For more about discussions, go here.
Adding Attachments
First you have to upload your file to your Group. Do this using the Attachments tab under the Resources header on the left.
Click the green Upload button on the right and select your file to upload it. Please note the maximum file size you can upload is 250MB.
You can then add your file by returning to the page you are editing and clicking Insert+ and then Attachments.